Working with tone
- May 18, 2017
- 2 min read
You may often find yourself editing a photo that has issues with tone or appears to have a colour cast, perhaps having an overall blue look or maybe a bit too red. This may be due to the white balance being off, but it can also be caused by using filters, particularly heavy NDs like the Lee Stopper series, they aren't as neutral as you would think. The first response to correct this may be to adjust the white balance in Lightroom, which might fix the overall look of the image, but it can be bit of a blunt tool.
In the original image below there is an overall blue hue.


When I took the shot there was a blue hint to the sky, but there was also a warmth to the ground from the low sun coming from behind, however my transparency came out much bluer, adding a blue tone to the ground which I don't feel represented the scene. Looking at the histogram in LR I can see that there is a shift in blue to the right, with the blues dominating in the highlights.
If I were to assume that this was a white balance issue and adjust the temp to warm up the image I get this result.


So the ground has been warmed up, but so has everything else in the image. The blue cast in my sky has been warmed up, which I wanted to preserve, With WB I have no way of fine tuning which areas of my image I want to adjust.

A better way to adjust this is with the Tone Curve. The tone curve allows me to specify which colour I want to work with and fine tune it. Firstly we need to change the mode to Point Curve, this allows for fine tuning rather than relying on the sliders. Now we can select the blue channel to allow us to edit the curve only for blue, and leave red and green alone.
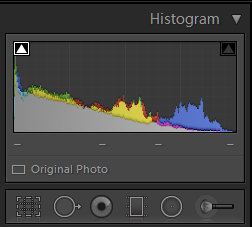
Looking at the histogram for the image, I can see that the blues are dominating in the highlights (which I can see in the sky) and that they need reduced in the shadows to balance out the colour better.

By adding a few points to the tone curve and pulling down the curve I can reduce my blues in the shadows while retaining the blues in the lighter areas of my image.
When I now compare my histograms I can see that only the blues in the shadows have shifted left, resulting in the blue cast being reduced.

And if we compare the original image with the edited one we can see that my sky still retains the strong blue, but now the ground appears more neutral


I haven't completely removed the blue cast to the ground, as I wanted to retain some of it, but overall the ground looks much more neutral and I feel that the grasses stand out more as well, providing contrast against the blue sky.
Comments